7.7 KiB
Git
Description
Git is a free and open source distributed version control system designed to handle everything from small to very large projects with speed and efficiency.
Useful links
- a very handy cheat sheet in pdf outlines the basic Git commands to help you learn git, as well as more advanced concepts such as Git branches, remote repositories, undoing changes, and much much more
- the main git documentation is an excellent reference manual
Git System
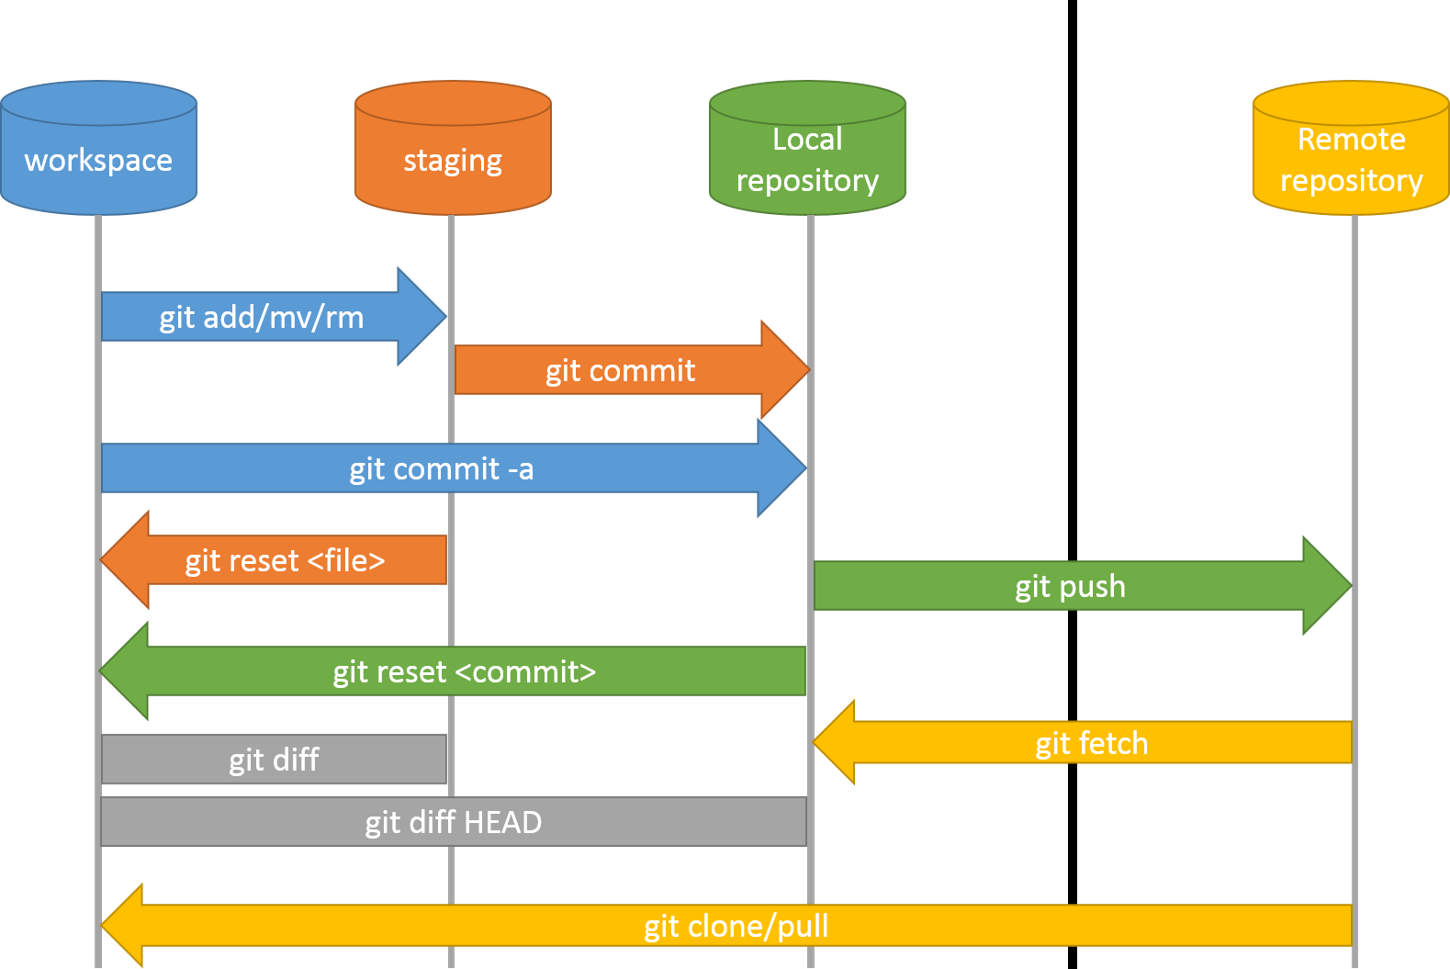
The diagram below outlines the main gt commands and how they relate to the version control system. In our classes the local is the repository on your own computer and the remote is the corresponding repository you create on our gitea server. Nothing is stopping you from hosting your own gitea server or pushing your local repository to a third party server such as gitlab.
A remote repository is often referenced by the name origin but this naming is fully up to you. If you would push to multiple remote locations you could for example add one named gitea for our own and gitlab for your gitlab account.
git remote add gitea https://gitea.86thumbs.net/USER/REPOSITORY.git
git remote add gitlab https://gitlab.com/USER/REPOSITORY.git
Basic commands
Git clone
Clone repo located at <repo> onto local machine. Original repo can be located on the local file system or on a remote machine via HTTPS or SSH. Throughout the classes you'll first clone via HTTPS but once we'll learn about RSA you'll be able to clone, push and pull over SSH.
git clone $REPOSITORY_URL
Git config --global name & email
Before you can use git you need to identity yourself. Git uses this information in each commit so we can keep track of who did what when.
git config --global user.name "$FISTNAME $LASTNAME"
git config --global user.email "$EMAIL"
Git init
To initialize an existing directory as a Git repository you have to input the following command into a shell. On windows your best bet is to launch a git bash shell by right clicking in the folder. On linux you can just open a terminal, navigate to the desired directory and execute the command.
git init
If you want to create a new directory with git version control inside it you run the following command.
git init $DIR_NAME
Git status
List which files are staged, unstaged, and untracked. This gives you a good overview of the current state of you repository and hints towards which files you can or should stage.
git status
Git add
By staging files you put them in the list to be added to the next commit. You can add one or more files at the same time. Complete directories can also be added.
git add readme.md image.jpg
Git commit
You commit your staged content as a new commit snapshot with the following command. The message you include in the commit is fully up to you but as a general rule of thumb it should explain what the commit does. For example: this commit "adds pictures to the asset folder" Some projects have serious commit message guidelines, others not.
git commit -m "$YOUR_COMMIT_MESSAGE"
If the identity is not correct you can fix this this the following command.
git commit --amend --reset-author
Git diff
Show unstaged changes between your index and working directory.
$ git diff
Git log
Show all commits in the current branch’s history
$ git log
Graphs
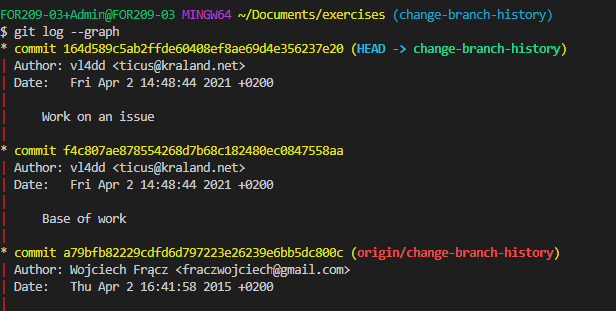
The --graph option draws an ASCII graph representing the branch structure of the commit history. This is commonly used in conjunction with the --oneline and --decorate commands to make it easier to see which commit belongs to which branch:
$ git log --graph --oneline --decorate
Tig
Tig allows you to browse changes in a Git repository and can additionally act as a pager for output of various Git commands. When used as a pager, it will display input from stdin and colorize it.
$ tig
When browsing repositories, Tig uses the underlying Git commands to present the user with various views, such as summarized commit log and showing the commit with the log message, diffstat, and the diff.
SHARE & UPDATE
Retrieving updates from another repository and updating local repos
=================================
add a git URL as an alias
git remote add [alias] [url]
fetch down all the branches from that Git remote
git fetch [alias]
merge a remote branch into your current branch to bring it up to date
git merge [alias]/[branch]
Transmit local branch commits to the remote repository branch
git push [alias] [branch]
git pull
fetch and merge any commits from the tracking remote branch
BRANCH & MERGE
Isolating work in branches, changing context, and integrating changes
git branch
list your branches. a * will appear next to the currently active branch
git branch [branch-name]
create a new branch at the current commit
git checkout
switch to another branch and check it out into your working directory
git checkout -b|-B <new_branch> []
Specifying -b causes a new branch to be created as if git-branch(1) were called and then checked out.
If -B is given, <new_branch> is created if it doesn’t exist; otherwise, it is reset. This is the transactional equivalent of
git merge [branch]
merge the specified branch’s history into the current one
git log
show all commits in the current branch’s history
TRACKING PATH CHANGES
Versioning file removes and path changes
=================================
Delete the file from project and stage the removal for commit
git rm [file]
Change an existing file path and stage the move
git mv [existing-path] [new-path]
Show all commit logs with indication of any paths that moved
git log --stat -M
Checker le satus
git status
Ajouter un element dans la branche
git add Readme.md
Commit les changement
git commit -m "First commit"
Show all commit
git checkout
Merge
git merge
Setup
Configuring user information used across all local repositories
git config --global user.name “[firstname lastname]”
set a name that is identifiable for credit when review version history
git config --global user.email “[valid-email]”
set an email address that will be associated with each history marker
git config --global color.ui auto
set automatic command line coloring for Git for easy reviewing
Saving your uncommitted work for a quick fix then getting it back
git stash
temporarily stash your work since your last commit
git stash pop
fetch your stashed work to continue it
$ git stash pop stash@{2}
in case you want to apply a specific Stash item (not the most recent one), you can provide the index name of that item in the "pop" option
Rewriting history
git commit --amend -m "New commit message"
replace the last commit
git commit --amend --no-edit
replace the last commit without changing the commit message
git rebase -i {branch}
take the precedent commit and add it to your branch
Ignoring files
touch .gitignore && echo {what you want to ignore} >> .gitignore
create a file and specify what (extensions, directories, files) to ignore in it
git rm --cached {fileignored}
remove from the tracking index a file that should be ignored but wasnt because already tracked when the ignore rule was created


