23 KiB
Pushing SSH a bit further
What is SSH
Origins
SSH is the current standard for remote logins but you might want to read up a bit on what was used before SSH existed. This is a pretty good blog post on the history of SSH. You should never use the following the following programs anymore but it's good to be aware of their historic existance.
- rlogin
- rsh
- rcp
- telnet (still has some legitimate usage such as with munin)
The main advantage of SSH is it's encryption.
It works similarly to SSL which you use all the time to do most of your web browsing.
When using encryption it becomes very hard to sniff the data traveling between the client and the server.
There are two versions of SSH, version 1 and version 2, and you should only use version 2 as the former is not considered secure anymore.
The recommended encryption used by most SSH servers is AES.
If you're interested in understanding the mathematics behind AES, this class is exceptionally good but not for the faint of heart.
It's however not mandatory to fully understand the math behind encryption to use it though.
The main takeaway would be the number of bit's used where higher is better.
By default ssh uses a very secure cipher but you can specify which one you want with the -c flag to ssh.
Do keep in mind that the server needs to support the cipher you're requesting.
SSH keys
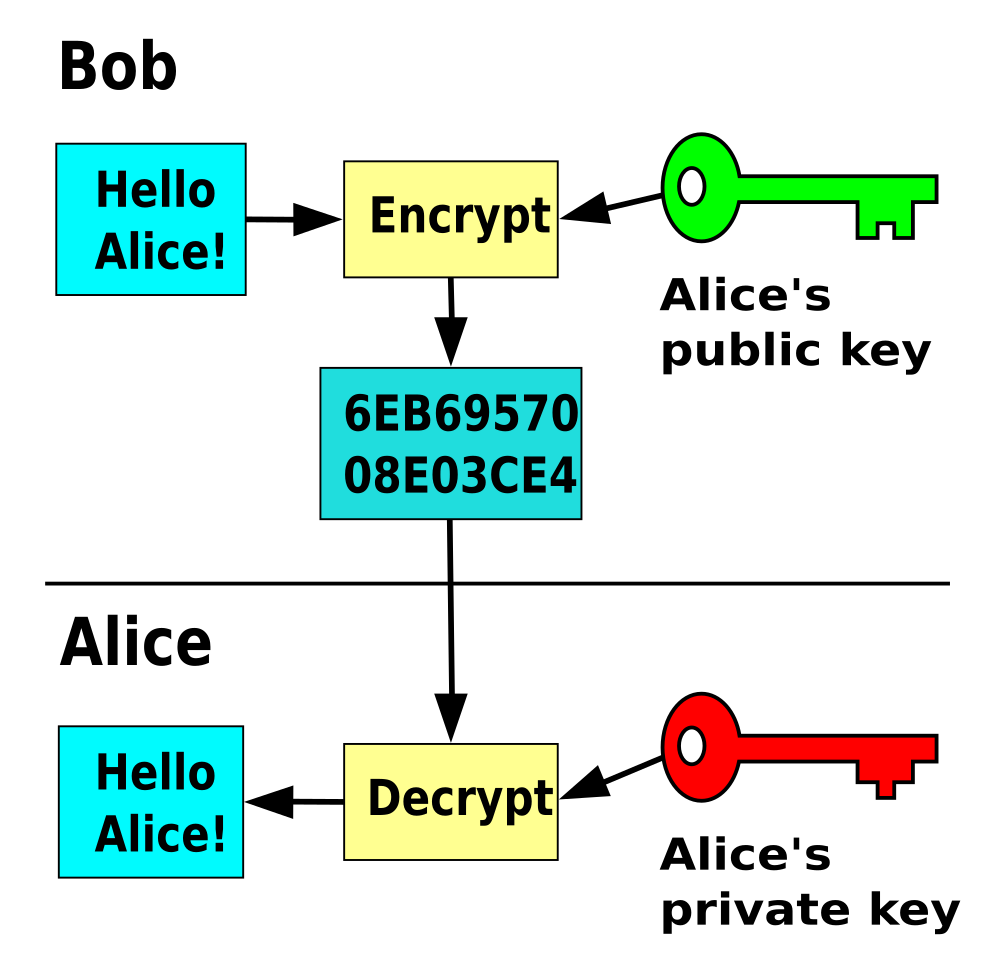
SSH encryption and SSH keys are not the same thing. Keys are used for authentication with a server. Once the client is authenticated and granted access to the server, the encryption is set to encrypt the traffic from client to server and visa versa. SSH keys are asymmetric key pairs where you have two simple text files. One with the private part, which is used for decrypting, and one public part which is used for encrypting. Both parts together form one key pair. If you're interested in the maths behind key pairs, have a look at this 15min video, it's a lot easier than you expect!
Generating keys
SSH comes with ssh-keygen to generate keys.
Keys are by default stored in ~/.ssh/ and named id_rsa for the private part, and id_rsa.pud for the public part.
Important, each generated key is unique so if you overwrite a key you made previously that old key is gone!.
There is no way to recover that old key anymore, gone is gone.
I highly advise you to keep backup's of your important keys, preferably in multiple locations.
GNOME Seahorse or keepass2 are good password managers you can use to store both passwords and key pairs.
An ssh key can be generated by running the ssh-keygen command.
You'll be prompted with a dialog that will ask to name and where to save the key pair, plus whether you want a password for that key or not.
For automated logins you should not set a password as it would defeat the purpose but you must realise that everyone that has access to the private key will be able to log in to each server the key is deployed to.
Keeping this file safe becomes very important.
Remember the bandit SSH key level?
➜  ~ git:(master) ✗ ssh-keygen
Generating public/private rsa key pair.
Enter file in which to save the key (/home/waldek/.ssh/id_rsa): my_ssh_key
Enter passphrase (empty for no passphrase):
Enter same passphrase again:
Your identification has been saved in my_ssh_key.
Your public key has been saved in my_ssh_key.pub.
The key fingerprint is:
SHA256:ndWgt3PjUjrdfaBMudQFJM8xCrjPKXlvg9TRYsWz2UQ waldek@helloworld
The key's randomart image is:
+---[RSA 2048]----+
|         .. oo=.E|
|        .  o B++.|
|         .. +o+*.|
|        .. ++++..|
|        S+o+*o*  |
|        o *+.X +.|
|         + oB o +|
|          . +o  .|
|           . .   |
+----[SHA256]-----+
➜  ~ git:(master) ✗
The current default is to generate an RSA key of 2048 bits which is currently considered secure.
You can change the scheme and bit depth with the -t and -b arguments respectively.
Have a look at the man ssh-keygen pages for more info.
Deploying keys
Just generating a key is not that useful, we need to know how to use them.
In order to understand that we need to have a look at how an ssh connection works.
When you try to establish an ssh connection you can add a -v flag to make the output more verbose.
You'll see output along the lines of this:
➜  qualifying git:(master) ✗ ssh student@localhost -v
OpenSSH_7.9p1 Debian-10+deb10u2, OpenSSL 1.1.1d  10 Sep 2019
debug1: Reading configuration data /home/waldek/.ssh/config
debug1: Reading configuration data /etc/ssh/ssh_config
debug1: /etc/ssh/ssh_config line 19: Applying options for *
debug1: Connecting to localhost [127.0.0.1] port 22.
debug1: Connection established.
debug1: identity file /home/waldek/.ssh/id_rsa type 0
debug1: identity file /home/waldek/.ssh/id_rsa-cert type -1
debug1: identity file /home/waldek/.ssh/id_dsa type -1
debug1: identity file /home/waldek/.ssh/id_dsa-cert type -1
debug1: identity file /home/waldek/.ssh/id_ecdsa type -1
debug1: identity file /home/waldek/.ssh/id_ecdsa-cert type -1
debug1: identity file /home/waldek/.ssh/id_ed25519 type -1
debug1: identity file /home/waldek/.ssh/id_ed25519-cert type -1
debug1: identity file /home/waldek/.ssh/id_xmss type -1
debug1: identity file /home/waldek/.ssh/id_xmss-cert type -1
debug1: Local version string SSH-2.0-OpenSSH_7.9p1 Debian-10+deb10u2
debug1: Remote protocol version 2.0, remote software version OpenSSH_7.9p1 Debian-10+deb10u2
debug1: match: OpenSSH_7.9p1 Debian-10+deb10u2 pat OpenSSH* compat 0x04000000
debug1: Authenticating to localhost:22 as 'student'
debug1: SSH2_MSG_KEXINIT sent
debug1: SSH2_MSG_KEXINIT received
debug1: kex: algorithm: curve25519-sha256
debug1: kex: host key algorithm: ecdsa-sha2-nistp256
debug1: kex: server->client cipher: chacha20-poly1305@openssh.com MAC: <implicit> compression: none
debug1: kex: client->server cipher: chacha20-poly1305@openssh.com MAC: <implicit> compression: none
debug1: expecting SSH2_MSG_KEX_ECDH_REPLY
debug1: Server host key: ecdsa-sha2-nistp256 SHA256:iALTEcfl6AjvOnT0TWBNrp/PsuWem/ZiP+uGRVEeFaE
debug1: Host 'localhost' is known and matches the ECDSA host key.
debug1: Found key in /home/waldek/.ssh/known_hosts:1
debug1: rekey after 134217728 blocks
debug1: SSH2_MSG_NEWKEYS sent
debug1: expecting SSH2_MSG_NEWKEYS
debug1: SSH2_MSG_NEWKEYS received
debug1: rekey after 134217728 blocks
debug1: Will attempt key: /home/waldek/.ssh/id_rsa RSA SHA256:tOuvE+Qq1B/eXyGcyIfs0MVXaaSI/GNYjLqO3D+Tz+k
debug1: Will attempt key: /home/waldek/.ssh/id_dsa
debug1: Will attempt key: /home/waldek/.ssh/id_ecdsa
debug1: Will attempt key: /home/waldek/.ssh/id_ed25519
debug1: Will attempt key: /home/waldek/.ssh/id_xmss
debug1: SSH2_MSG_EXT_INFO received
debug1: kex_input_ext_info: server-sig-algs=<ssh-ed25519,ssh-rsa,rsa-sha2-256,rsa-sha2-512,ssh-dss,ecdsa-sha2-nistp256,ecdsa-sha2-nistp384,ecdsa-sha2-nistp521>
debug1: SSH2_MSG_SERVICE_ACCEPT received
debug1: Authentications that can continue: publickey,password
debug1: Next authentication method: publickey
debug1: Offering public key: /home/waldek/.ssh/id_rsa RSA SHA256:tOuvE+Qq1B/eXyGcyIfs0MVXaaSI/GNYjLqO3D+Tz+k
debug1: Authentications that can continue: publickey,password
debug1: Trying private key: /home/waldek/.ssh/id_dsa
debug1: Trying private key: /home/waldek/.ssh/id_ecdsa
debug1: Trying private key: /home/waldek/.ssh/id_ed25519
debug1: Trying private key: /home/waldek/.ssh/id_xmss
debug1: Next authentication method: password
student@localhost's password:
The connection will try any form of authentication allowed by the server in order of most secure to least secure.
Publickeys are considered more secure than passwords so it will try that first.
You can see this at the following line debug1: Will attempt key: /home/waldek/.ssh/id_rsa RSA SHA256:tOuvE+Qq1B/eXyGcyIfs0MVXaaSI/GNYjLqO3D+Tz+k.
The student account does not have the matching public key as an authorized key so the client tries a password login next debug1: Next authentication method: password.
On the server side the sshd process will look for a matching public key in the users home directory.
By default it will try every line in the ~/.ssh/authorized_keys file for authentication.
If a match is found, you'll be granted access, if not it will try an other authentication method until every method allowed by the server is exhausted and you'll be denied access.
The verbose output of a successful login with a key pair can be seen below.
➜  ~ git:(master) ✗ ssh student@localhost -v
OpenSSH_7.9p1 Debian-10+deb10u2, OpenSSL 1.1.1d  10 Sep 2019
debug1: Reading configuration data /home/waldek/.ssh/config
debug1: Reading configuration data /etc/ssh/ssh_config
debug1: /etc/ssh/ssh_config line 19: Applying options for *
debug1: Connecting to localhost [127.0.0.1] port 22.
debug1: Connection established.
debug1: identity file /home/waldek/.ssh/id_rsa type 0
debug1: identity file /home/waldek/.ssh/id_rsa-cert type -1
debug1: identity file /home/waldek/.ssh/id_dsa type -1
debug1: identity file /home/waldek/.ssh/id_dsa-cert type -1
debug1: identity file /home/waldek/.ssh/id_ecdsa type -1
debug1: identity file /home/waldek/.ssh/id_ecdsa-cert type -1
debug1: identity file /home/waldek/.ssh/id_ed25519 type -1
debug1: identity file /home/waldek/.ssh/id_ed25519-cert type -1
debug1: identity file /home/waldek/.ssh/id_xmss type -1
debug1: identity file /home/waldek/.ssh/id_xmss-cert type -1
debug1: Local version string SSH-2.0-OpenSSH_7.9p1 Debian-10+deb10u2
debug1: Remote protocol version 2.0, remote software version OpenSSH_7.9p1 Debian-10+deb10u2
debug1: match: OpenSSH_7.9p1 Debian-10+deb10u2 pat OpenSSH* compat 0x04000000
debug1: Authenticating to localhost:22 as 'student'
debug1: SSH2_MSG_KEXINIT sent
debug1: SSH2_MSG_KEXINIT received
debug1: kex: algorithm: curve25519-sha256
debug1: kex: host key algorithm: ecdsa-sha2-nistp256
debug1: kex: server->client cipher: chacha20-poly1305@openssh.com MAC: <implicit> compression: none
debug1: kex: client->server cipher: chacha20-poly1305@openssh.com MAC: <implicit> compression: none
debug1: expecting SSH2_MSG_KEX_ECDH_REPLY
debug1: Server host key: ecdsa-sha2-nistp256 SHA256:iALTEcfl6AjvOnT0TWBNrp/PsuWem/ZiP+uGRVEeFaE
debug1: Host 'localhost' is known and matches the ECDSA host key.
debug1: Found key in /home/waldek/.ssh/known_hosts:1
debug1: rekey after 134217728 blocks
debug1: SSH2_MSG_NEWKEYS sent
debug1: expecting SSH2_MSG_NEWKEYS
debug1: SSH2_MSG_NEWKEYS received
debug1: rekey after 134217728 blocks
debug1: Will attempt key: /home/waldek/.ssh/id_rsa RSA SHA256:tOuvE+Qq1B/eXyGcyIfs0MVXaaSI/GNYjLqO3D+Tz+k
debug1: Will attempt key: /home/waldek/.ssh/id_dsa
debug1: Will attempt key: /home/waldek/.ssh/id_ecdsa
debug1: Will attempt key: /home/waldek/.ssh/id_ed25519
debug1: Will attempt key: /home/waldek/.ssh/id_xmss
debug1: SSH2_MSG_EXT_INFO received
debug1: kex_input_ext_info: server-sig-algs=<ssh-ed25519,ssh-rsa,rsa-sha2-256,rsa-sha2-512,ssh-dss,ecdsa-sha2-nistp256,ecdsa-sha2-nistp384,ecdsa-sha2-nistp521>
debug1: SSH2_MSG_SERVICE_ACCEPT received
debug1: Authentications that can continue: publickey,password
debug1: Next authentication method: publickey
debug1: Offering public key: /home/waldek/.ssh/id_rsa RSA SHA256:tOuvE+Qq1B/eXyGcyIfs0MVXaaSI/GNYjLqO3D+Tz+k
debug1: Server accepts key: /home/waldek/.ssh/id_rsa RSA SHA256:tOuvE+Qq1B/eXyGcyIfs0MVXaaSI/GNYjLqO3D+Tz+k
debug1: Authentication succeeded (publickey).
Authenticated to localhost ([127.0.0.1]:22).
debug1: channel 0: new [client-session]
debug1: Requesting no-more-sessions@openssh.com
debug1: Entering interactive session.
debug1: pledge: network
debug1: client_input_global_request: rtype hostkeys-00@openssh.com want_reply 0
debug1: Remote: /home/student/.ssh/authorized_keys:1: key options: agent-forwarding port-forwarding pty user-rc x11-forwarding
debug1: Remote: /home/student/.ssh/authorized_keys:1: key options: agent-forwarding port-forwarding pty user-rc x11-forwarding
debug1: Sending environment.
debug1: Sending env LC_CTYPE = en_GB.UTF-8
debug1: Sending env LANG = en_GB.UTF-8
Linux helloworld 4.19.0-17-amd64 #1 SMP Debian 4.19.194-1 (2021-06-10) x86_64

The programs included with the Debian GNU/Linux system are free software;
the exact distribution terms for each program are described in the
individual files in /usr/share/doc/*/copyright.

Debian GNU/Linux comes with ABSOLUTELY NO WARRANTY, to the extent
permitted by applicable law.
student@helloworld:~$
So, how did I add my public key to the student's account authorized keys?
There is a program called ssh-copy-id that can do it for you, but I personally always just copy and paste it to the users ~/.ssh/authorized_keys file.
This is an example of a server I use with the public keys that are allowed to log in.
As you can see there are four key's that are allowed to log in.
ssh-rsa AAAAB3NzaC1yc2EAAAADAQABAAABAQC9FDWJ6Dr45xQsv/dwqxBVtXuHORtfKtw7tuIe0nq4wRAhdz9XGJ+3s1Czj2YvlMV6rjxjpShG39A6Tnj9oQmqcWdxhmrXAjBQNgVJP6Gpg1NaXSsysEDcKjOcKqqwCHxQ6mYZCl7/vtQotZsTQ+aQW65+D+L6vxNEO6m+XDI283dM1FGQhn7OAN/tZf+tLRT6A4QCF1YEtb2uOsNsU8B+ilBNreqekvJRJ2dYT2QHdNdS2aEMhnHWzsnh4f2bzbpugoiWPGKiHwazePisWUU2/DjQmDq6d3sJ4AeQCt8R4ZlptOleGLdTNCjhRMDvUAMcNsR9OyeFiSok7DFHQw3Z waldek@leanone
ssh-rsa AAAAB3NzaC1yc2EAAAADAQABAAABAQDGKt7Qn9SSSJ7apRbCAqOYltUP+oM5wOIRQ3TLHwiGPYYHt38XWUrUjklRKWH+hagMnHiPHxbloYTtm/OzS9OXOTQJH4n+5c0Jq3OHrMQDztsqWK//gsxBZd7wlA/j6O/7Pr/6jxL0w+bwt1k+VDZR/3Mms3mRfmvGMeg5Wmr2/5GrTZocrUrKH4zgINoAk+6698T9E4YUQp1SLCg634KHA5HqupB9H7aLMovJ1p4K+qOV/MtspzgDvIkZMTFRZ9JvDqYWovaYlr5/zHBnag6/tPgBl+kmEDx6q8mybdtsB9oeARM2O2KKUISzA0PawBFbCNcI3RUSd91trzlhhUQ8 pi@pizone
ssh-rsa AAAAB3NzaC1yc2EAAAADAQABAAABAQDRFprKfRnfxs5lxJXfB5166OHPHHUFr4x2bqxAUc/vtkfmopytf/rhRtgnUeffoZW+KmzhWXuUKw+AjXOfO2OtsyMkbQoJKb3gsZ+KknsWsLEWCx5f8V0sc7y5UHedAuaE9Ax+KqnbPnXJWNtRVxjJCcsWnZNSKERwSjNV/K4yWsFwcdwQirurLB1AZXF0wSNd9ch4/fNX8CjOTuEkOhsUgZ9NZbNAV0LgiVeqghY9JsNt40kYNYX2BQNWk9oEaKdn0YCP+em6CPrDA6MT/rkScr+DPOGpT6GBtXirj+Krw924KjF6eSH9dnWy/ysKlp0CvflQOaVN1zEVZjDGwiAz waldek@vps-42975ad1
ssh-rsa AAAAB3NzaC1yc2EAAAADAQABAAABAQCnKJ8fwHAEe6NS7MTqlAtqzUzqA0ATibR1XP8nirZritVQv7uDNVH91SKM5GSP5gTOzCmW4NQVVv47KvmRQ6yp6BugCsKL96rPMA6m/b9cTA5YDwm90cfb5I6h+kRL2mp4O63ahgGDAb5XgVy3Tq2qyxLbbkKylhw6VQFsHQXObTevSvMrRzc8t29DwS/tfbhT3R6opa2j+5woXDLpKaHrBsw9LFoelkh8jgQ9fbDx2hXwzeccaT3qpycRjtwhraVtt/FTEpJ60R+ooB/Nx2ndlT4qs3P/G3HFrbvlLzjMGlAcjHNkXgQRy6850ACC8RtM6+s4K1RCNU0fPXSy3tkb waldek@helloworld
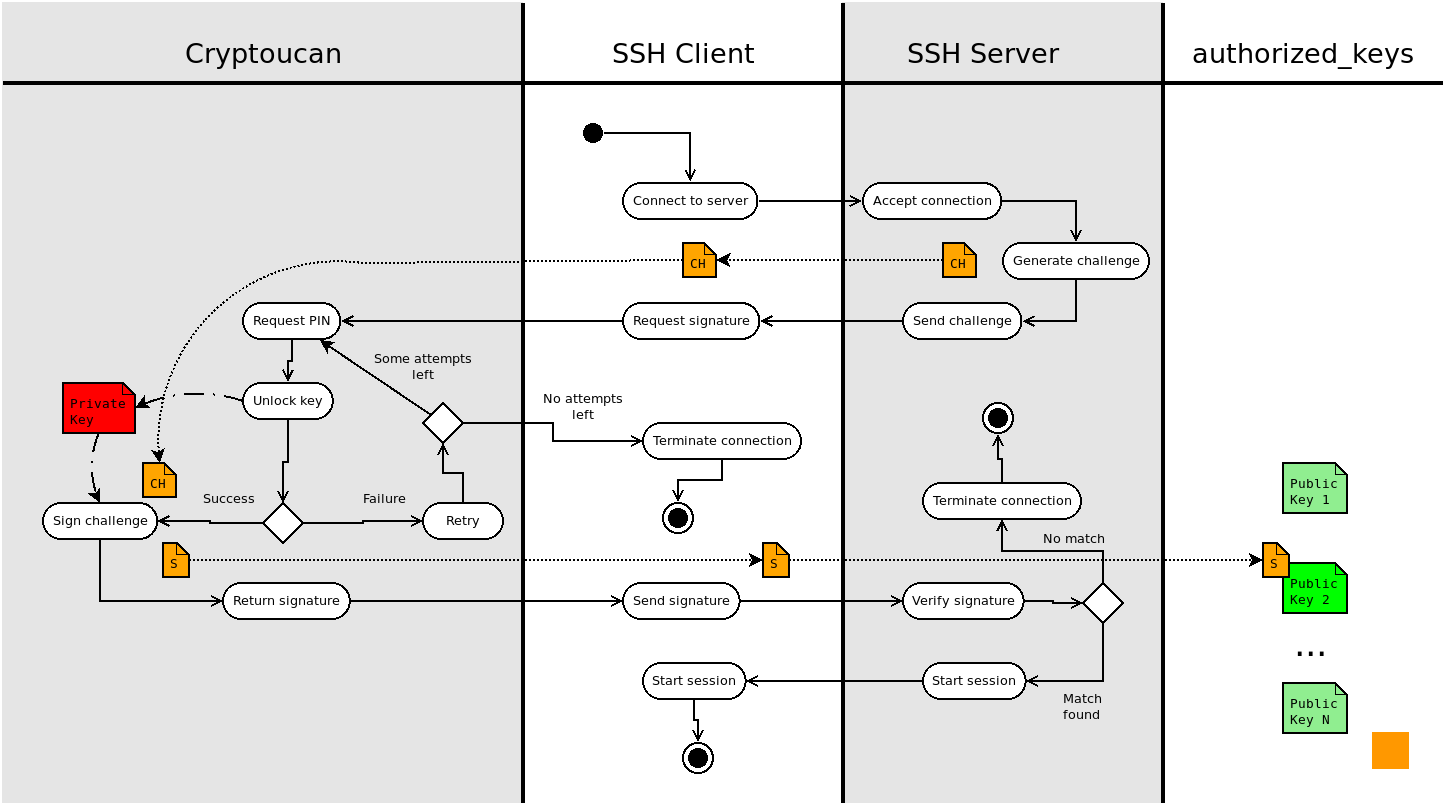
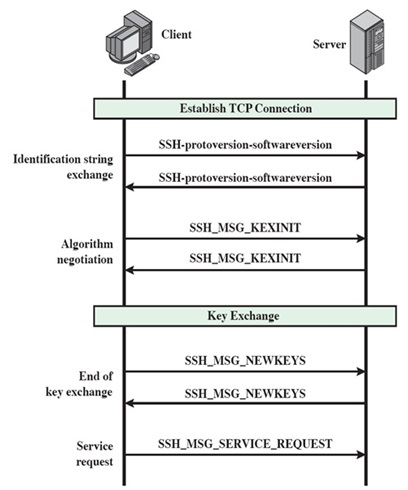
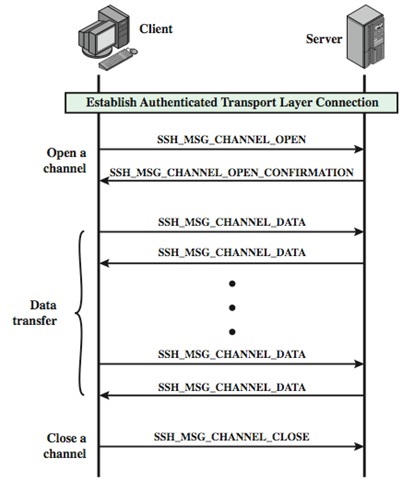
Below are visual breakdowns to help you understand the connection process a bit better. The first one is a flowchart illustration the entire process from connection to access or failure. The second one is a vertical timeline and the third one the actual transmission of a successful connection.
Keys for gitea
Now that you know how to create your own RSA keys I would like you to:
- create one (and save it somewhere safe)
- use it to push/pull from your personal gitea
I'll let you figure it out by yourself but if you're stuck have a look at this and this.
Standard usage
The basic usage of ssh is what you've been doing up until now, logging into remote machines.
Now that you know how to add keys for automated logins, it's time to learn a few handy tricks.
The first one is a bit basic but handy non the less.
You can add a command to execute after the ssh $USER@$HOST so it becomes as follows.
In this particular case it shows me information about the mounted partitions.
➜  ~ git:(master) ✗ ssh waldek@172.30.4.19 df -h
Filesystem      Size  Used Avail Use% Mounted on
udev             16G     0   16G   0% /dev
tmpfs           3.2G  347M  2.8G  11% /run
/dev/sda1       219G   99G  109G  48% /
tmpfs            16G   16K   16G   1% /dev/shm
tmpfs           5.0M     0  5.0M   0% /run/lock
tmpfs            16G     0   16G   0% /sys/fs/cgroup
tank            386G  128K  386G   1% /usr/share/zpool
tank/set1       573G  187G  386G  33% /usr/share/zpool/set1
tank/set2       386G  128K  386G   1% /usr/share/zpool/set2
tank/set3       100M  128K  100M   1% /usr/share/zpool/set3
tmpfs           3.2G     0  3.2G   0% /run/user/1000
➜  ~ git:(master) ✗
A second nice thing to know about is the ~/.ssh/config file.
In this file you can add shortcut's to hosts you often contact.
As an example I would like to add a shortcut to my matrix server.
➜  ~ git:(master) ✗ ssh matrixserver
ssh: Could not resolve hostname matrixserver: No address associated with hostname
To create the shortcut I append the following to my ~/.ssh/config file.
Host matrixserver
	Hostname 172.30.4.19
	Port 22
	User waldek
	IdentityFile ~/.ssh/id_rsa
I can now log in as follows.
➜  ~ git:(master) ✗ ssh matrixserver
Linux debian 4.19.0-16-amd64 #1 SMP Debian 4.19.181-1 (2021-03-19) x86_64

The programs included with the Debian GNU/Linux system are free software;
the exact distribution terms for each program are described in the
individual files in /usr/share/doc/*/copyright.

Debian GNU/Linux comes with ABSOLUTELY NO WARRANTY, to the extent
permitted by applicable law.
You have new mail.
Last login: Tue Jul 13 14:12:18 2021 from 172.30.40.99
➜  ~
SFTP
We've done quite a bit of SFTP before so we won't go into detail here but if you forgot, go have a look at the networking exercises in the resources directory.
I'm mentioning it because it's crucial to remember it's existence in order to understand the next topic, sshfs.
If it's all a bit vague I urge you to read the man sftp-server.
SSHFS
Thanks to the sftp subsystem of ssh we can use it to copy files form one system to an other.
Some clever guy's used it to build sshfs which mounts a remote folder into our system so we can use it like a network share.
It's a poor mans NFS that can be a true lifesaver.
You'll have to install it onto the client where you want to mount the folder to.
This can be done as follows, sudo apt install sshfs.
The server just needs a running sshd process with the internal-sftp subsystem configured but most, if not all, default ssh servers have this.
➜  ~ git:(master) ✗ ls media/sshfs
➜  ~ git:(master) ✗ sshfs waldek@172.30.4.19:/home/waldek media/sshfs
➜  ~ git:(master) ✗ ls media/sshfs
basement_session_1  broken_machines  downloads      go               ipdb         mbox   sources  test.sh
bigone.ovpn         configuration    gitea.service  homeserver.yaml  linux64.out  media  test.py
➜  ~ git:(master) ✗ df -h
Filesystem                       Size  Used Avail Use% Mounted on
udev                             5.8G     0  5.8G   0% /dev
tmpfs                            1.2G   40M  1.2G   4% /run
/dev/mapper/helloworld--vg-root  226G  165G   50G  77% /
tmpfs                            5.9G   87M  5.8G   2% /dev/shm
tmpfs                            5.0M  4.0K  5.0M   1% /run/lock
tmpfs                            5.9G     0  5.9G   0% /sys/fs/cgroup
/dev/sda1                        236M  129M   95M  58% /boot
tmpfs                            1.2G     0  1.2G   0% /run/user/998
tmpfs                            1.2G   24K  1.2G   1% /run/user/1000
waldek@172.30.4.19:/home/waldek  219G   99G  109G  48% /home/waldek/media/sshfs
➜  ~ git:(master) ✗
Once you're done with the share you can unmount it as follows.
➜  ~ git:(master) ✗ ls media/sshfs
basement_session_1  broken_machines  downloads      go               ipdb         mbox   sources  test.sh
bigone.ovpn         configuration    gitea.service  homeserver.yaml  linux64.out  media  test.py
➜  ~ git:(master) ✗ sudo umount media/sshfs
➜  ~ git:(master) ✗ ls media/sshfs
➜  ~ git:(master) ✗
Nice no?
You can even add these mounts to your /etc/fstab file!
SSHuttle
SSHFS gives us a poor man's NFS and SSHuttle a poor man's VPN.
Again, this is very handy additional program to install on your ssh client which requires no modifications to the ssh server you're connection to.
You install it with trusty old apt, sudo apt install sshuttle.
Now, what does it do? It creates a connection to a remote ssh server and adds local iptable rules to send all (or some) traffic via that remote server onto the internet. In practice it behaves as a VPN. To test this out I added an for you to one of my remote servers. Use the private key I'll give you in class to authenticate yourself as student@sproutsin.space. The syntax is as follows.
➜  ssh-keys git:(master) ✗ curl icanhazip.com
85.28.111.118
➜  ssh-keys git:(master) ✗ sshuttle -r student@sproutsin.space -x sproutsin.space 0.0.0.0/0 --ssh-cmd 'ssh -i student' -D
➜  ssh-keys git:(master) ✗ curl icanhazip.com
51.195.42.244
➜  ssh-keys git:(master) ✗ killall sshuttle
➜  ssh-keys git:(master) ✗ curl icanhazip.com
85.28.111.118
➜  ssh-keys git:(master) ✗
This might look a bit intimidating but I'll break down the command line options a bit.
sshuttleis the program you're using to create the VPN (it's a python3 script)-r student@sproutsin.spaceis the remote host you want to send your traffic to-x sproutsin.spaceis needed to exclude traffic to that specific host (the connection would fail otherwise)0.0.0.0/0is the IP range you want to send through the VPN, in this case it's everything--ssh-cmd -i studentis needed to specify our specific private key (not needed if you use~/.ssh/id_rsa.pub)-Dwill daemonize the VPN so you can continue to use the shell
Tweaking the sshd configuration file
All server configuration is done in the /etc/ssh/sshd_config file.
Starting version TO_CHECK you can use the modern /etc/ssh/sshd_config.d/ folder system to override default system configuration.
This way any changes to the standard configuration made by the package maintainers won't mess with your custom preferences and tweaks.
Version
A modern sshd configuration will only allow version 2 but you can check or specify this in the configuration file. You'll probably never have to set this yourself but do keep it in mind when you're confronted with old installations.
Protocol
             Specifies the protocol versions sshd(8) supports.  The possible values are ‘1’ and
             ‘2’.  Multiple versions must be comma-separated.  The default is ‘2’.  Protocol 1
             suffers from a number of cryptographic weaknesses and should not be used.  It is
             only offered to support legacy devices.

             Note that the order of the protocol list does not indicate preference, because the
             client selects among multiple protocol versions offered by the server.  Specifying
             “2,1” is identical to “1,2”.


