6.8 KiB
Setting up a pihole at home
What you'll need to get started:
- essentials
- a raspberry pi
- a USB power supply
- an SD card you can erase
- an Ethernet cable
- optional
- a keyboard and mouse
- an HDMI cable and screen
Your current situation
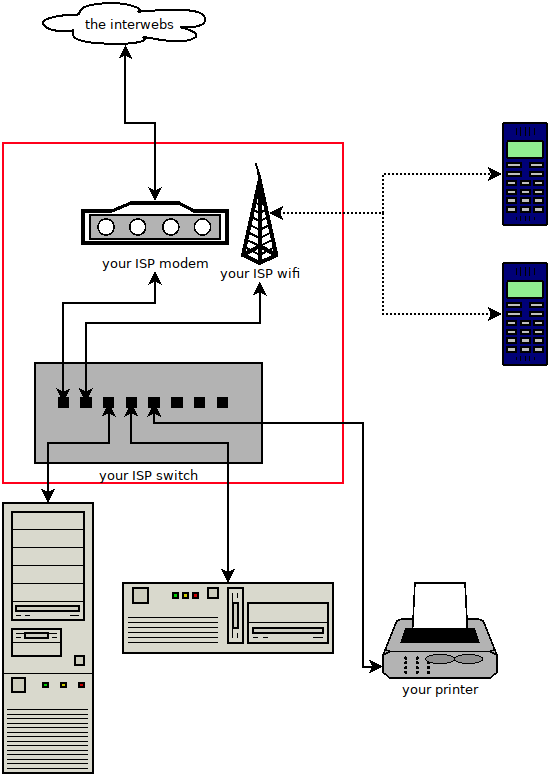
Your current situation at home looks probably very similar to the image below. You have some sort of router/modem/switch/wireless access point combination box sitting somewhere in your house. To this device you have your PC's, printer, phone's connected either with a cable or over WiFi.
I advise you to take some notes on your network settings before starting to mess around with the pihole.
Your DNS resolution is probably done by your router and the DHCP server for both your wired LAN and wireless WLAN is probably also done by that same box.
This means your bbox does a few different things:
- it's a modem that gives you a public IP address (from your ISP)
- it does NAT so that your LAN devices can access the internet
- it has a builtin DHCP and DNS server
- it creates a wireless access point so you can connect your phone over WiFi
- it has a builtin hardware switch so you can connect multiple PC's as a LAN
As you found out during our previous exercises, a Linux machine can do all of these things if you configure it for it. We'll try and replace two, or for the brave ones three, of those features with a raspberry pi. This will be done step by step but it's worth pointing out that a basic pihole installation is not invasive at all. You won't break the internet by just installing the pihole package onto your raspberry pi. Throughout the full installation it is however possible you'll have some downtime. If there are people in your household depending on the internet for work it might be best to schedule your installation with them.
Hardware installation
It's probably easiest, and recommended, to do the installation with the raspberry pi connected to your network over Ethernet.
You can connect the raspberry pi over WiFi but I discourage it because of the inherent latency of wireless connections.
You can perform the installation over ssh or with a screen and keyboard connected, it's fully your choice.
Do whatever feels best/easiest to you.
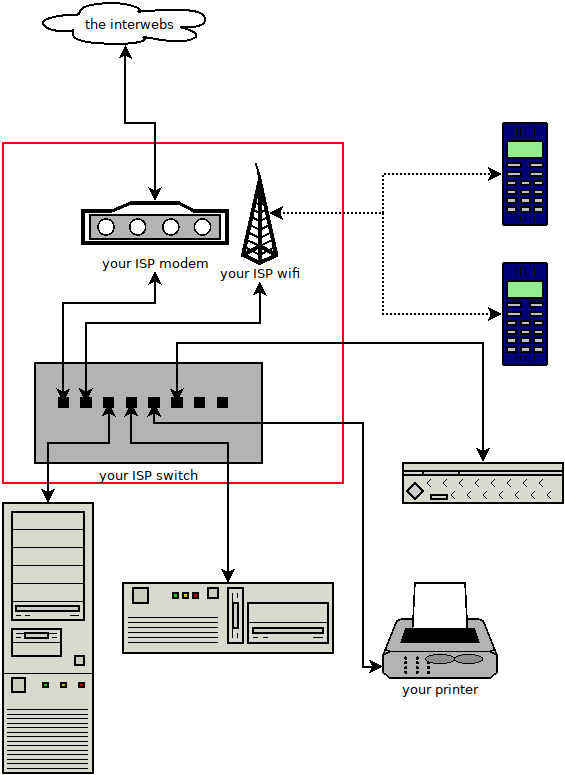
Contrary to the setup in class you don't need an extra LAN adaptor, just plugging in the raspberry pi into the switch suffices.
You won't be replacing the NAT part of your home network today, just the DNS and DHCP part.
Once plugged in your network layout will look similar to the image below.
I recommend you start from a fresh Raspberry PI OS installation, either with or without desktop environment.
The raspberry pi should receive an IP address from your bbox and you should be able to ping devices in your LAN and out onto the internet.
Installing pihole
I won't explain this as it's part of the exercise but there are a lot of tutorials around. I encourage you to read up before you start the installation so you get an idea of the steps ahead of you.
At first you should only use the DNS feature of the pihole. This is completely non invasive to your network, nor towards the other computers in your home network. Once installed, check the installation by logging into the web interface of your fresh pihole install!
Testing the DNS aspect of the pihole
Your pihole is now a DNS server! You can try it out by changing the DNS settings of a PC that's connected to your network. focus on one PC at first. Once you'll add the DHCP part to the pihole, all devices on your network will use the pihole as DNS.
Depending on your OS it will be done in a different way.
On Linux you'll find the nameserver you're using in /etc/resolv.conf.
If you did it right, you should see a client connected in the web interface of the pihole.
Try to go to some websites you know have a lot of advertisements and see if the pihole blocks them properly.
You can inspect the log to see which DNS queries are blocked and which pass right thru.
Time to take over the DHCP role
The pihole can also be in charge of the IP addresses on your LAN. This way the pihole pushes itself as nameserver to be used by your clients.
This is the invasive part of the setup. First you should turn off the DHCP server that is currently running on you network. As mentioned before, this is probably your bbox. Log into it and figure our how to deactivate it. Once this is done you can enable the DHCP server on the pihole. This is done via the web interface. Try disconnecting and reconnecting a PC from the network and see if it comes up in the leases list. If it does, bravo!
Undoing your installation
If you want to revert back to your original network layout the main thing you have to do is turn the DHCP server in your bbox back on.
Do keep in mind you can't have two DHCP servers on your network.
You can either turn off the raspberry pi completely or just stop the pihole service via systemctl.
Try to disconnect and reconnect one PC first to see if it gets back the normal settings you noted down before.
If it does, you successfully removed the pihole from your network!
For the brave
The raspberry pi has a builtin WiFi adapter you can use to create your own WLAN network. You can either have the clients join in the same range as your LAN network, or create a secondary subnet. If you opt for the latter you'll have to tweak you DHCP settings a bit. The package that turns your pi into a wireless access point is called hostapd and you can find heaps of tutorials online.
For the super brave
We'll set up a VPN in an upcoming class but the pihole is often used together with pivpn. If you decide to try this out keep in mind that you'll have to add a port forward from your router to the pi and that this will expose the VPN service to the internet! There is nothing inherently wrong with that but you'll see hacking attempts almost immediately.
Use good passwords or preferably encryption keys.
Some hints
- The configuration for the pihole is fully done via the web interface but in case you want to have a browse on the pi itself, these are some of the interesting files and folders to look at:
/etc/dnsmasq.d//etc/dnsmasq.d/01-pihole.conf/etc/dnsmasq.d/02-pihole-dhcp.conf/etc/dhcpcd.confis named a bit confusingly but it configures your network interfaces (like/etc/network/interdaceson Debian)/etc/pihole
- Even though the pihole uses
dnsmasqas a backend for DHCP and DNS the services themselves are controlled bypihole-FTL.service. - The pihole comes with a command line program called
piholewhich you can use to restart, tweak and inspect the running service as well.

